Maximize Your Lead Conversion: Build an Effective Agent Accountability System

We’ve all heard that the most important thing you can do when converting new leads is to contact them fast and to contact them multiple times throughout their lifetime to have the greatest chances of both filling your pipeline and converting your real estate leads to see a positive ROI on any given lead source.
Sierra Interactive’s amazing toolset will allow you to create your agent accountability systems within Sierra so that you can hold both yourself and your team accountable. This will ensure that each lead you add to your database is contacted and engaged with. Below, we will cover the steps for using Sierra Interactive’s tools to design your accountability systems.
Creating your agent accountability system will require using a few different features in Sierra, like our Smart Filters, Lead Tags and Tasks. Now we are going to look at how to combine all of these great features, using automations, into an accountability system that will help you and your team convert more leads into buyers and sellers.
First, we’re going to start with Lead Tags. These will be used to group real estate leads so that you can filter for them on the Leads Dashboard and trigger certain actions or events with the Automations.
Now, from the Lead Tags Dashboard, we can create a new category for organizing these tags and the tags we will need for the Accountability System.
We’re going to name this new category “Automations and Systems”, and then feel free to select any color that you’d like to use. Once you’ve created your new category we’re going to next create two tags to start our own agent accountability system. Those will be “Lead Not Viewed” and “Lead Not Contacted”.
Once both tags have been created, we can now create the smart filters that will provide you with an easy place to view these leads and take action with one of your many Bulk Actions. As an administrator on the team, this will give you a quick overview of which leads are falling between the cracks in your real estate database. As an agent on your team, these filters will help ensure they’re staying on top of these new leads and giving them the greatest chance of success converting these leads into Buyers and Sellers.
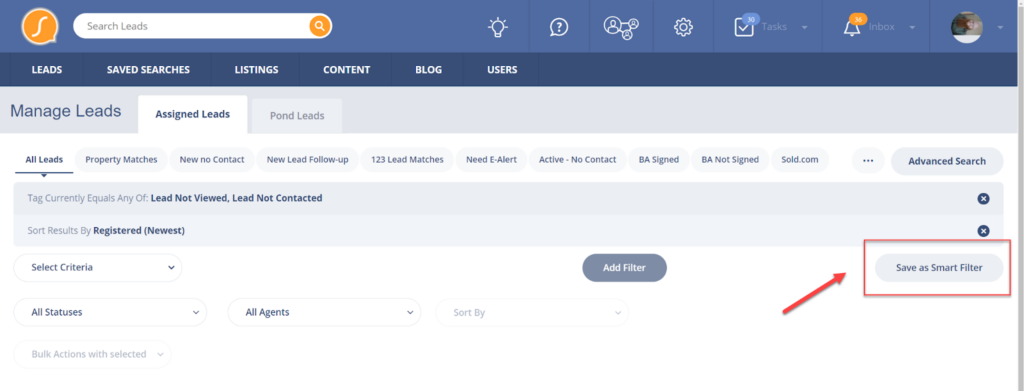
To create your smart filters, you will navigate to the Leads Dashboard and click advanced search in the top right-hand corner of the dashboard.
From the Leads Dashboard, creating a filter for organizing these leads that are failing your agent accountability checks is quick and easy. We’ll start by selecting “Advanced Search” in the top right corner of the Lead Dashboard and then select the “Tag” criteria and filtering for any leads that have been tagged with the Tags we created above; “Lead Not Viewed” and “Lead Not Contacted”.
If you are looking to be more advanced with your Smart Filter, you can to continue to add additional logic in before clicking the save button. A great compliment is to also sort your results by “Registered Newest” to keep the most recently received leads at the top of your priority list.

Now that we have our criteria selected, we can click “Save As Smart Filter” and name this filter “Priority: Needs Follow-up”. If you want your Agents to also be able to use this filter, make sure to check the box that allows them to import this filter.
Okay, we are almost done creating our own agent accountability system. The last piece will use Sierra Automations to tie all the pieces together. By ensuring we are held accountable for all leads going forward, we’ll now have more free time in our lives.
For the automations, we are going to be creating checks that occur automatically through the lead’s lifetime. For the sake of my example I will be creating checks for 3 minutes after lead registration and 24 hours after lead registration. You can scale this system as far out as you’d like to match your expectations for touch points throughout a lead’s lifetime by using our robust automation triggers and criteria.
To start creating your automations, you’ll click your gear icon in the top right corner of the real estate CRM, and then select Automations.
Sierra’s automations will allow for five Triggers, five Criteria Filters and five Actions for each automated workflow that you create. We won’t need all of those for the two we are creating, but this will give you more than enough room to refine these to match your team’s specific needs.
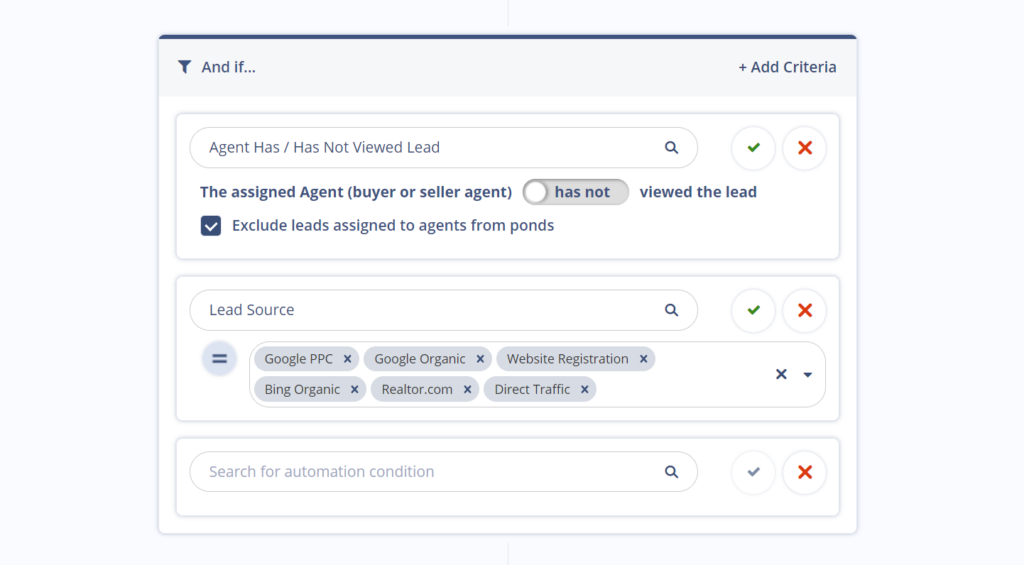
Our first automation will use the Lead Assignment Trigger. For this, we’ll exclude leads that are being claimed from the ponds, and then set this Accountability check to occur 3 minutes after registration.
The real magic with our Accountability Systems takes place in the Criteria section. We’ll start by using the filter “Agent Has / Has Not Viewed Lead” and set this filter to only take action on leads that are not being viewed within 3 minutes after being assigned to an agent. We’ll also add additional criteria for “Lead Source” so these checks only occur for the leads that we want them to.
We’ll wrap up this automation and start connecting all those pieces together by adding actions. We’ll start with Applying Tag to the Lead and adding our Lead Not Viewed Tag. This will now dynamically put the lead into the Smart Filter we created to give increased visibility into the lead not being engaged with and take further action.
We can also combine this with additional Actions to send a notification to the agent on your team, informing them that they have a lead to engage with.

As well as creating a system task for the assigned agent to call the lead ASAP.

Our final Automation will look like the following once all the parts have been put together.

Now that the hardest part is done, we can duplicate the 3-minute Accountability automation and adjust the different parts to match the next step in our Accountability System. For my automation, I will create a 24-hour check to give the real estate agent one day to complete the call to their recently assigned lead or face an additional system action, like being removed from Lead routing.
I will name my Automation “Lead Check-in 24 Hours”. Once named, we can click edit and adjust the trigger to the desired timeframe.
Next, the first criteria in the list will need to be updated to “Agent Phone Calls Not Placed Within the Past 1 Day”. This means that any agent who did not complete a phone call will now face whatever actions we choose in the last part of our automation.
For the Actions, I will apply the tag “Lead Not Contacted” and remove the Lead “Not Viewed Tag”. These will be combined with moving the lead into a pond where other agents on your team can capitalize on this uncontacted lead.

With this basic agent accountability structure, you can modify your own accountability system to match your expectations for your team. You can even automate actions like removing real estate agents who failed this check from further lead routing distribution until you are ready to begin receiving new leads. This allows you to coach them while removing any worry about whether your high-performing agents are being accountable within the CRM.
Learn more by scheduling a demo with our team of experts today.
Author

Related Posts

Sierra Spotlight
Lift Up Local 2025: Celebrating Real Estate Leaders...

Lead Generation
How to Dominate 2026: The Five Pillars Every...

Lead Generation
Sierra Replay: A Look Back at 2025

Lead Nurturing